Table of Contents
PC running slow?
You should read these fix recommendations when you learn how to install SATA drivers in case of a BIOS error on your PC. During a trunk, enter the BIOS setup program by pressing F2.Depending on your card, you will see the following: Go to Configuration > SATA Drives, set Configure SATA to IDE. Go to Advanced > Disk Setup, set ATA/IDE Mode to Native.Press F10 to save and exit.
PC running slow?
ASR Pro is the ultimate solution for your PC repair needs! Not only does it swiftly and safely diagnose and repair various Windows issues, but it also increases system performance, optimizes memory, improves security and fine tunes your PC for maximum reliability. So why wait? Get started today!

This document describes the legacy installation of Serial ATA (SATA) drives on a specific computer running Windows Vista. Computers designed for Windows XP use ATI’s own hard drive management method, while Windows Vista uses its own Serial ATA (SATA) technology. Installing a different ATI hard drive in your computer while using Windows Vista will cause compatibility issues.
Even if you think your computer has moved from Vista to XP, it may still display an error message that the operating system cannot find all hard drives. If the installer cannot access the hard drive, it cannot install the XP operating system. The BIOS of any type of computer running Vista is configured for a SATA operating environment and cannot recognize ATI people. This is possible, for example, by overriding BIOS settings that allow XP to recognize the hard drive.
Note:
.
Of course, there are three ways to install SATA on the actual Windows installation drive.
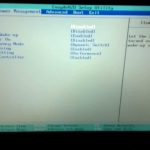
Disable These Custom SATA Drives In BIOS
How do I enable SATA in BIOS?
Turn on my system.Press the F2 key on the Sunbrand screen to enter the BIOS setup menu.In the BIOS utility dialog, select Advanced -> IDE Setup.In the IDE configuration window, select “Configure SATA as” and press Enter.
If your BIOS has an option to disable native SATA layout in BIOS, follow these steps.
-
Turn off your computer.
-
Press the setup key and press f10 to open the BIOS setup type.
-
Use the cursor to enter the configuration options to find the native SATA setting.
-
If there are SATA regional settings, select the Disable option, then press F10 to save changes and restart your computer normally.
If the SATA setting is missing, use one of the remaining options in this document to change the actual settings.
Windows Offline Installation
This procedure is for third-party software and is typically performed by users of your own software.desktop computer.
-
Find your computer’s processor type, and then visit the processor manufacturer’s website to find the latest SATA AHCI driver. Some SATA AHCI drivers are available from this website www.hp.com. For more information, see HP Notebook PCs – HP Finds Software, Drivers, and BIOS Updates.
-
Download and install a common file manager.
Note: Total Commander is effective for this example. See the software help files for more information.
-
Download and install data CD/DVD recovery software.
Note: For this example ISO Ultra is typically used. For more information, see the Personal Recordings help.
Extract Files
-
Launch Total Commander by clicking Start, All Programs, Total Commander, then Total Commander 32. If you are using the unregistered version, please follow the instructions in the Windows popup.
Note: AdditionalFor detailed instructions and help on working with Total Commander, see the Total Commander help file.
-
Locate the downloaded SATA AHCI driver using the directory in the Total Commander tree. Select the SATA AHCI driver.
Figure: SATA AHCI driver detected
-
On the File menu, click File and select Extract Specific Files.
-
Enter your destination for catalog ordering.
Number entry: unpacking location
-
Search for extracted files.
-
Repeat every F6flpy32 decompression for .exe.
-
Typically, the temp.IMA file extracted from F6flpy32.exe is opened with an Ultra ISO file or equivalent.
Drawing. IMA driver temporary files
-
Copy the temp.IMA driver files to a sensitive floppy, burn the files to a CD.
Disable Native SATA Mode
This option is not normally available in the BIOS on Vista models.
-
Turn on the laptop.
-
Press the F10 key (or any other keyassigned on all laptops) until the laptop displays the full computer screen layout.
-
Use arrow keys to select System Setup.
-
Use the arrow keys to select SATA Native and set the mode to Disable.
Fig. Disable SATA mode
-
Press F10 (or uppercase to accept changes).
-
Exit Save Changes and Computer Configuration.
-
Notepad should restart.
Installing Windows Using Native SATA Drivers
To install Windows using Vista’s built-in SATA driver, follow these steps:
-
Turn on the laptop.
-
Insert the Windows XP build CD into your optical CD/DVD drive.
-
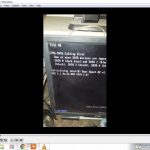
Press F6 when prompted:
Image hint for third party drivers
-
Press the S key to define the accessory.
Fig. Specify additional device
-
Insert the SATA driver in drive A.
Insert picture: Driver disc
-
Follow the instructions on the screen.
Enable Native SATA Mode
-
When turning on the laptop, usually press the F10 key (or whatever key is specified on the laptop) several times until the laptop enters the computer setup screen.
-
Use arrow keys to select System Setup.
-
Use the arrow keys to select SATA Native Mode and set the corresponding mode to Enable.
Drawing. Enable native SATA mode
-
Press one of the F10 keys (or another key to make changes).
-
Save changes and exit Computer Setup.
-
Notepad should restart.
RIS (Remote Installation Services)
This procedure is usually performed by the IT department while online.
-
Download the latest Intel Matrix Storage Driver Manager.After downloading the Intel Matrix Storage Manager main folder, create a folder named Sataand copy the iata61_enu.exe file you just downloaded from the link above.Intel Storage Matrix Manager also includes a SATA driver.
-
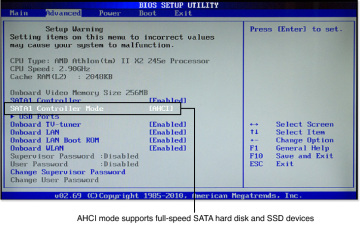
How do I enable SATA SSD in BIOS?
Restart your computer and press the F2 key after the first screen.Press Enter to enter settings.Select Serial ATA and also press Enter.You will then see the “SATA Controller Mode” option.Save your changes and restart your computer to enter the BIOS.
Use the following command to extract each iata61_enu file:
c:sata.-a exe -a -pc:sata
When done, the current installation process begins; just click on these dialog boxes when prompted. This does not restore the driver, but simply extracts all driver files in
-
Copy the extracted file to make sure you have hosted the RIS distribution point (on a specific RIS server):
RemoteInstallSetup
Images i386 -
Copy to files:
RemoteInstallSetup
Images $oem$$1driverssata -
How do I know if my SATA drive is in BIOS?
Restart your computer and enter System Setup (BIOS) by pressing F2.Check the hard drive detection switch in the install settings.Enable auto-detect for future use.Also reboot and check if the drive is detected in the BIOS.
Open the main RemoteInstallSetup
Images i386txtsetup.sif file with Notepad and add the following lines to the known sections (section names are in parentheses): -
Save the file using the “Exit Notepad” command.
-
Open Remote InstallSetup
Images i386templatesristndrd.sif with Notepad and in the [Unattended] section add the followinglines: -
Save file and delete notepad.
-
To complete the process, stop the BINL service on the RIS server by rebooting as follows:
Go to the shortcut, type net stop binlsvc and press Enter. Then type net start followed by binlsvc and press Enter.

The RIS install point is now updated with the SATA driver.
Improve the speed of your computer today by downloading this software - it will fix your PC problems.Lösningar För Att Installera SATA-drivrutiner I BIOS
Soluciones Para Instalar Controladores SATA En Todo El BIOS
Soluzioni Per L’installazione Di Driver SATA Nel BIOS
Oplossingen Voor Het Installeren Van SATA-stuurprogramma’s BIOS
Lösungen Für Die Installation Von SATA-Treibern Im BIOS
Rozwiązania Dotyczące Instalacji Sterowników SATA W Systemie BIOS
Soluções Para Instalação De Drivers SATA No BIOS
Решения по установке драйверов SATA в BIOS
BIOS에 SATA 드라이버 설치를 위한 솔루션
Solutions Parce Que L’installation Des Pilotes SATA Dans Le BIOS