Table of Contents
Sometimes your computer may generate an error code telling you how to create an ad hoc network in Windows 7. There can be several reasons for this error.
PC running slow?
Open the start menu.Click on the control panel.Click Network & Internet.Click Network and Sharing Center.Under Change Network Settings, click New Connection or Transfer Network.Select Set up wireless ad-hoc network (PC to PC) to # 1.Click Next twice.
Dummies mean you are dealing with complex and easily understandable assumptions. Mannequins help you be more informed and confident in applying your knowledge. Whether you pass this great test, get your Ph.D., or even master this cooking technique; People who rely on models rely on them to provide important yet relevant information for the skills they need to succeed.
If you don’t have a Wi-Fi hotspot, you have access. Windows 7 allows you to create a permanent temporary.A network between two or more computers. This is a special connection, and if soYou need to temporarily share folders, electronic devices, or an Internet connection. Notice thatComputers that must not be more than 9 m apart for this type of accessory to work.
Here are the steps to create an ad hoc wireless network:
- Open the Wireless Management window as mentioned earlier.
- Click Add. Windows 7 displays the message “How do you want to add a network?” “K. Chat.
- Click” Create Ad Hoc Network. “Windows 7 shows a specific wireless network to configureNetwork dialog box.
- Click Next.
- Please provide some of the following entries for our network:
- Network Name – The name of the ad hoc network.
- Security Type is the security protocol used by the Promotion Hoc wireless network.Select No (open) network authentication that you want to prove unsecured.Special network.
- Save this network – check this box to save the shortcut toManage the list of wireless networks.
- Click Next. Windows 7 creates a dedicated marketing and advertising network.
- If you would like to share your current Internet connection from your computer, click Activatethe Internet “.Connection approval.
- Click Close. Windows 7 adds an ad campaign to your network list on the webWindow for managing wireless networks.
How do I add a network in Windows 7?
Click the “Start” button, then click “Control Panel”. In the Control Panel window, also click Network and Internet. In the “Network and Internet” period, click “Network and Sharing Center”. In some of the Network and Sharing Center windows, under Change network settings, click Set up a new working connection or a new network.
NOTE Another way to start creating a post-hoc CI wireless network is to useIn the Network and Sharing Center, click the Set up connection or Network link to configureSelect a connection option, select Configure Wireless Peer-to-Peer Networking (Computer-to-Computer), and then click Next.
Currently, other men and women within nine meters of your computer can see your ad-hoc network on theirList of available wireless networks. Note that the network usually remains available as long as at least one computer is connected, includingThe computer that created the network. The network is removed when all programs (includingmachine that created the network) are turned off.
While this is not usually recognized by non-experts, it is possible to connect Wi-Fi computers to each other regardless of access to the wireless router on the other side; this function is known toas a special network.
In ad hoc networks, multiple computers connect directly to each other using the same wireless cards that are used to connect to a somewhat standard wireless router or access point. In this article, we’ll walk you through the process of setting up a Windows Always on 7 ad hoc network.
How To Create A Peer-to-peer Network In Windows 7
How do I set up an ad hoc network on Windows 7?
Open the “Manage Wireless Networks” window as described earlier.Click onthe Add button.Click Create Peer-to-Peer Network.Click Next.Provide the following information to take the network to the first level:Click Next.If you want to share your computer’s Internet connection, click Turn On Internet Connection Sharing.
The first step of the tactic requires us to start with the Network and Sharing Center, as shown in Figure 1 below. You can access the entire Windows 7 Network and Sharing Center from the Ultimate Control Panel.
From now on there should be two different ways to create a peer-to-peer network:
- one of the wizards to configure a potential network connection
- the other uses the Wireless Management Control Panel.
Which one to use depends on your preference. The ad-hoc network only needs to be configured for the first program configured.
Configuring Peer-to-Peer Networking Using The Connection Or Network Wizard
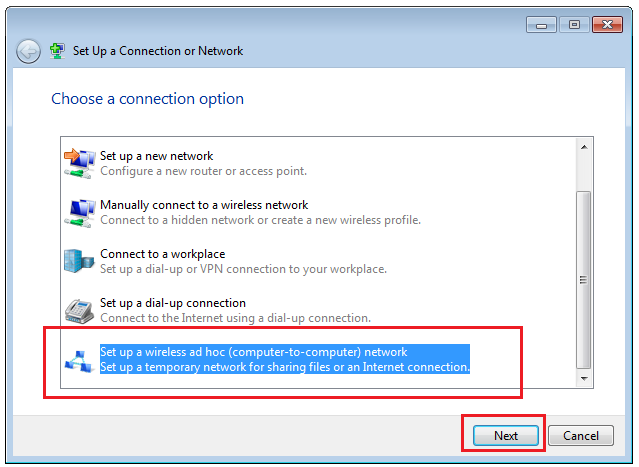
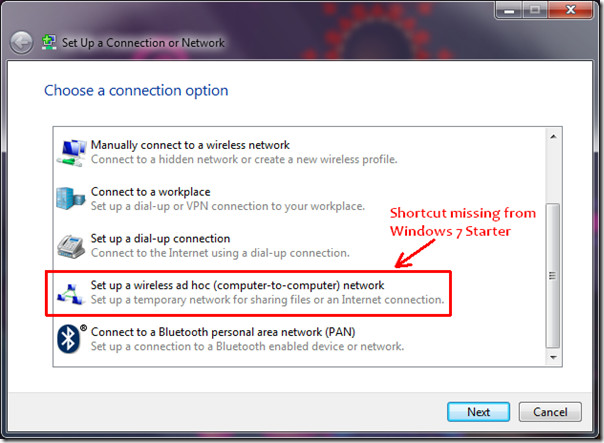
When usedand of this method of the wizard, the first thing to do is to select the option “Create any type of new connection or network” in the current main window; this is shown in Figure 1.
At the bottom of the list is an option that was confirmed when setting up a wireless peer-to-peer network (computer-to-computer). After selecting this option, the window shown in Figure 3 should appear.
The window shown in Figure 3 describes our own Hoc ad network and requirements. After viewing all the text in this window, click Next.
PC running slow?
ASR Pro is the ultimate solution for your PC repair needs! Not only does it swiftly and safely diagnose and repair various Windows issues, but it also increases system performance, optimizes memory, improves security and fine tunes your PC for maximum reliability. So why wait? Get started today!

Figure 4. Name your service and select Security Options.
The second window, shown in Figure 4, allows the user to select a network name, a security choice, and a security key to be placed between the computers. It is still very useful to have a solid security option even if only two computers or laptops are connected, as there is always the possibility that someone nearby will exploit a security hole.
It is also possible to save this network; If a number is specified in this field, the wireless network will be registered in the list.available wireless networks that you can connect to.
After the network is configured as peer-to-peer, the window shown in Figure 5 will appear; This completes the whole process with a wizard method.
Manage Your Peer-to-peer Network Configuration Using The Wireless Control Panel
If you are using the corrective action in the Manage Wireless Networks control panel, the first task is to select most of the Manage Wireless Networks options in the upper left corner of the main window; This can be described as shown in Figure 6.
After selecting the “Manage wireless local area networks” option, the area shown in Figure 7 is displayed. In this window, the next option is to select the Add option to add a new wireless network.
Once the “Add” option is given, the window shown in Figure 8 is finally displayed. This window uses the “Create Peer-to-Peer” option to help you create a peer-to-peer network. This
After selecting this option, a scrolling window will appear in which to transmit These are the same wireless peer-to-peer parameters that are commonly used in the previous method. This process is shown in Figures 9, 10 and 11.
Figure 10. Give a name for your personal network and select prevention options
If you chose to keep this network when creating the ad hoc network group, it will appear in the Cellular Networks Management section, as shown in Figure 12.
Regardless of whether the “Keep this network” option is selected, the computer detects the newly created peer-to-peer network. However, if the network has not been saved, by the time the computer is restarted or a new connection to the wireless tower network is established, the ad-hoc network will not be available without re-creating it. / P>
In fig. 13 shows how a peer-to-peer network will watch TV in the “Available Networks” window at the top of the computer on which the peer-to-peer network is created.
Connect To The Already Created Peer-to-peer Network
The configuration of computers that will connect to the installed wireless peer-to-peer network is the same as for any othertype of wireless network. Figure 14 shows the networks available in a cell as they are on all other computers. The various icons to the right of each network name indicate the most important type of wireless network.
Just select a command and login. If no wireless security is selected, the network will be specially connected; After configuring the wireless security, you should probably see the window shown in Figure 15 where you can enter the security key.
Once connected, the network will appear as connected, as shown in Figure 16.
Peer-to-Peer IP Addressing
How do I manually add a wireless network in Windows 7?
Click Network and Internet -> Show Internet 2. 0 Status and Tasks or Network and Sharing Center. However, click on “Manage Wireless Networks” in the “Network and Sharing Center” sidebar. Click “Add”, another window will open. Click manually create a network profile.
Another important thing to keep in mind is that the DHCP forum does not usually work on computer hosts. This always means that the IP address is not automatically assigned as is usually the case with a wireless router or locator point.
There are two options available: either use APIPA addressing (169.254.0.0/16), which automatically allows a wider connection between two computers if the server cannot be contacted, or usestatic IP addressing dhcp.
Figures 21-18 show the output of the “ipconfig” and “arp –a” commands, typically on computers connected through a peer-to-peer network and receiving APIPA addressing. The addresses of both computers can be seen in each other’s ARP tables.
Ad Hoc Network is very useful when you’re trying to connect computers that now have the Wi-Fi capabilities you need and don’t have an active Wi-Fi router to connect them to each other. If in such situations it is necessary to network computers, then the peer-to-peer option is certainly a highly customizable option that includes these capabilities.
Ready to put your Windows networking infrastructure skills to the test? Find out how they handled this Smarterer review. Start testing this Windows networking infrastructure now

Étapes Pour Se Débarrasser Du Problème De Mise En Réseau Post-hoc Dans Windows 7
Stappen Om Ad-hocnetwerkproblemen In Windows 7 Te Verhelpen
Passaggi Per Eliminare Il Problema Di Rete Ad Hoc In Windows 7
Kroki, Aby Skutecznie Pozbyć Się Kryzysu Sieciowego Ad Hoc W Systemie Windows 7
Schritte Zum Aufdecken Von Ad-hoc-Netzwerkproblemen In Windows 7
Pasos Para Deshacerse Del Problema De Red De La Campaña Publicitaria En Windows 7
Steg För Att Bli Av Med Ad Hoc-nätverksbördan I Windows 7
Etapas Para Se Livrar Da Doença De Rede Ad Hoc No Windows 7
Шаги по безопасному избавлению от проблем с сетью в Windows 7
Windows 7에서 Ad Hoc 네트워킹 문제를 제거하는 단계